顯示具有 FreeBSD 標籤的文章。 顯示所有文章

2017年6月13日 星期二

FreeBSD安裝GitLab

enter image description here

前言

環境參數:

  • OS:FreeBSD i386 , 10.3-RELEASE-p11
  • CPU:Intel(R) Core(TM)2 Duo CPU @ 3.00GHz
  • RAM:4096 MB
Gitlab需要以下的系統元件

要正常運作 Gitlab ,依照文件所載明,系統上需安裝以下的元件並能正常運行。

  1. Packages / Dependencies
  2. Ruby
  3. System Users
  4. Database
  5. Redis
  6. GitLab
  7. Nginx

安裝必要套件

更新系統符合utf-8

$ pkg update
$ pkg upgrade

安裝系統套件

以下的指令是一次下達完成,當然也可以一個個的下(略過已經安裝或不想升級的套級)

$ pkg install sudo bash icu cmake pkgconf git nginx node ruby ruby22-gems logrotate redis postgresql95-server postgresql95-contrib postfix krb5 gmake go

設定gem

$ gem install bundler --no-ri --no-rdoc

Fetching: bundler-1.14.3.gem (100%)
Bundler and RubyGems.org are free for anyone to use, but maintaining them costs more than $25,000 USD every month. Help us cover those costs so that we can keep the gem ecosystem free for everyone: https://ruby.to/support-bundler
Successfully installed bundler-1.14.3
1 gem installed

設定 /etc/rc.conf

$ vi /etc/rc.conf

# Core services
sshd_enable="YES"
ntpd_enable="YES"
ntpd_sync_on_start="YES"

# GitLab services
redis_enable="YES"
postgresql_enable="YES"
gitlab_enable="YES"

# Web server
nginx_enable="YES"

# Postfix/Sendmail
postfix_enable="YES"
sendmail_enable="NO"
sendmail_submit_enable="NO"
sendmail_outbound_enable="NO"
sendmail_msp_queue_enable="NO"

設定 Git

新增git相關使用者及組群

直接以管理者身份進行定比方便,su -l或sudo -s

# 新增使用者git
$ pw add user -n git -m -s /usr/local/bin/bash -c "GitLab"

# 新增群組名稱:redis並將使用者git加入群組內.
$ pw groupmod redis -m git

設定 Postgres 資料庫

# Postgre db初始化(第一次執行)
$ service postgresql initdb

# 啟動Postgres db
$ service postgresql start

# 以 pgsql 使用者登入系統
$ su - pgsql

# 連接Postgres database
$ psql -d template1

連接Postgres資料庫後,進行下列設定:

‘template1=#’是系統提示符號,不需要輸入.

# 設定pg_trgm 關聯性
template1=# CREATE EXTENSION IF NOT EXISTS pg_trgm;

# 新增GitLab使用者:git
template1=# CREATE USER git CREATEDB;

# 建立GitLab專用資料庫並授權予git使用者 production database & grant all privileges on database
template1=# CREATE DATABASE gitlabhq_production OWNER git encoding='UTF8';

# 退出資料庫
template1=# \q

設定 Redis

先備份原始設定/usr/local/etc/redis.conf。

$ cp /usr/local/etc/redis.conf /usr/local/etc/redis.conf.orig

redis.conf相關設定

修正 redis.conf的 port預設值,變更為0:

$ vi /usr/local/etc/redis.conf

# Accept connections on the specified port, default is 6379.
    # If port 0 is specified Redis will not listen on a TCP socket.
    port 0

Redis socket設定,

確定設定檔/usr/local/etc/redis.conf最後三行中的unixsocket對應值:

aof-rewrite-incremental-fsync yes
unixsocket /usr/local/var/run/redis/redis.sock
unixsocketperm 770

如果沒有這行設定,則利用下面指令達成:

echo 'unixsocket /usr/local/var/run/redis/redis.sock' | sudo tee -a /usr/local/etc/redis.conf

再來,確認權限:

aof-rewrite-incremental-fsync yes
unixsocket /usr/local/var/run/redis/redis.sock
unixsocketperm 770

如果沒有這行設定,則利用下面指令達成:

echo 'unixsocketperm 770' | sudo tee -a /usr/local/etc/redis.conf

設定相關目錄,

$ mkdir -p /usr/local/var/run/redis
$ chown redis:redis /usr/local/var/run/redis
$ chmod 755 /usr/local/var/run/redis

啟動 redis

$ sudo service redis restart

安裝並設定 GitLab

#### 先改變路徑至git的家目錄
$ cd /home/git

#### 複制GitLab source
$ sudo -u git -H git clone https://gitlab.com/gitlab-org/gitlab-ce.git -b 8-10-stable gitlab

#### 改變路徑至剛才複制的gitlab
$ cd /home/git/gitlab

#### 複制 GitLab 設定檔
$ sudo -u git -H cp config/gitlab.yml.example config/gitlab.yml
# 編輯gitlab.yml
$ sudo -u git -H vim config/gitlab.ym
  1. host: git.mydomain #設定為自己的gitlab server網址名稱
  2. bin_path: /usr/local/bin/git #設定git的路徑
  3. 將所有的/home/git,變更實際系統路徑/usr/home/git, 視使用者家目錄的初始設定來彈性變更, 符號連結性的目錄名稱是無法運行的,故要變更為實際路徑.

接著,以root執行下列命令:

設定Gitlab Workhorse

$ cd /home/git
$ sudo -u git -H git clone https://gitlab.com/gitlab-org/gitlab-workhorse.git
cd gitlab-workhorse
$ sudo -u git -H git checkout v0.7.9
$ sudo -u git -H gmake

初始化GitLab資料庫

初始化資料庫,並開啟進階功能。
先確定config.yml的redis.sock路徑是否正確:

$ vi /home/git/gitlab/config/resque.yml
production: unix:/usr/local/var/run/redis/redis.sock

否則在建立資料表時會出現錯誤訊息:

rake aborted!
Errno::ENOENT: No such file or directory - connect(2) for /usr/local/usr/local/var/run/redis/redis.sock
/data/git/gitlab/vendor/bundle/ruby/2.2/gems/redis-3.2.2/lib/redis/connection/ruby.rb:180:in `connect_nonblock'
/data/git/gitlab/vendor/bundle/ruby/2.2/gems/redis-3.2.2/lib/redis/connection/ruby.rb:180:in `connect'
$ cd /home/git/gitlab
$ sudo -u git -H bundle exec rake gitlab:setup RAILS_ENV=production
# 輸入 'yes' 建立資料表。
# 完成後會出現訊息:'Administrator account created:'

Administrator 密碼設定及變更方式

  1. *第一次登入 GitLab 時會強制變更預設密碼。
  2. 如果想預先設定密碼,可在安裝時以參數GITLAB_ROOT_PASSWORD設定:
$ sudo -u git -H bundle exec rake gitlab:setup RAILS_ENV=production GITLAB_ROOT_PASSWORD=yourpassword

開機自動執行 GitLab

以root權限下載 FreeBSD的命令腳本,再置於* /usr/local/etc/rc.d*目錄下即可。

$ sudo cp ~git/gitlab/lib/support/init.d/gitlab /etc/init.d/gitlab
$ sudo chmod 555 /usr/local/etc/rc.d/gitlab

檢查設定並編譯執行檔

設定 GitLab 環境變數,

$ cd /home/git/gitlab
$ sudo -u git -H bundle exec rake gitlab:env:info RAILS_ENV=production
        System information
    System:     
    Current User:   git
    Using RVM:  no
    Ruby Version:   2.2.6p396
    Gem Version:    2.6.4
    Bundler Version:1.14.3
    Rake Version:   10.5.0
    Sidekiq Version:4.1.4

    GitLab information
    Version:    8.10.13
    Revision:   c593548717
    Directory:  /data/git/gitlab
    DB Adapter: postgresql
    URL:        http://git.twbest.biz
    HTTP Clone URL: http://git.twbest.biz/some-group/some-project.git
    SSH Clone URL:  git@git.twbest.biz:some-group/some-project.git
    Using LDAP: no
    Using Omniauth: no

    GitLab Shell
    Version:    3.2.1
    Repository storage paths:
    - default:  /data/git/repositories/
    Hooks:      /data/git/gitlab-shell/hooks/
    Git:        /usr/local/bin/git
順利看到成果後,就可以進行下一步的編譯工作,這會花一點時間,先喝杯咖啡,等會兒再回來看,依我的機器大概跑了10分鐘。

$ sudo -u git -H bundle exec rake assets:precompile RAILS_ENV=production

# 啟動Sidekiq
$ sudo -u git -H RAILS_ENV=production bin/background_jobs start

啟動 GitLab

Start GitLab service
來到這個階段,總算大功完成,接下來就以git使用者權限啟動 GitLab 服務,否則會出現錯誤訊息而致無法啟動。

$ sudo -u git /usr/local/etc/rc.d/gitlab start
GitLab is not running.
Starting GitLab Unicorn
Starting GitLab Sidekiq
Starting gitlab-workhorse
.
The GitLab Unicorn web server with pid 49327 is running.
The GitLab Sidekiq job dispatcher with pid 49364 is running.
The gitlab-workhorse with pid 49349 is running.
GitLab and all its components are up and running.

設定Nginx

在FreeBSD下,Nginx 的預設值是沒有啟用 gzip_static 模組,所以要手動啟用。

$ sudo mkdir -p /usr/local/etc/nginx/conf.d
$ sudo mkdir -p /usr/local/etc/nginx/ssl
$ sudo mkdir -p /var/log/nginx

# SSL
$ sudo fetch -o /usr/local/etc/nginx/conf.d/gitlab.conf https://gitlab.com/gitlab-org/gitlab-ce/raw/master/lib/support/nginx/gitlab-ssl

# HTTP
$ sudo fetch -o /usr/local/etc/nginx/conf.d/gitlab.conf https://gitlab.com/gitlab-org/gitlab-ce/raw/master/lib/support/nginx/gitlab

編輯/usr/local/etc/nginx/nginx.conf 設定檔:

$ sudo vi /usr/local/etc/nginx/nginx.conf
# 加入下列二行,載入相關模組。
# Nginx modules
load_module /usr/local/libexec/nginx/ngx_mail_module.so;
load_module /usr/local/libexec/nginx/ngx_stream_module.so;

編輯/usr/local/etc/nginx/conf.d/gitlab.conf*設定檔:

# 置換YOUR_SERVER_FQDN為自己的FQDN網址
  server_name YOUR_SERVER_FQDN; ## Replace this with something like gitlab.example.com

測試 Nginx的組態設定是否正常?

$ sudo nginx -t
nginx: the configuration file           /usr/local/etc/nginx/nginx.conf syntax is ok
nginx: configuration file /usr/local/etc/nginx/nginx.conf test is successful

看到測試成功了,就可以重新啟動 Nginx 服務。

$ sudo service nginx start

完成安裝 GitLab

最後,再次確認GitLab的設定一切正常,

cd /home/git/gitlab
sudo -u git -H bundle exec rake gitlab:check RAILS_ENV=production

enter image description here
依照畫面指示命令,來修復該修正或更改之處。接著在瀏覽器訪問Nginx設定 /usr/local/etc/nginx/conf.d/gitlab.conf中所設定的YOUR_SERVER_FQDN網址(http://your_server_fqdn)即可登入GitLab,首次登入按本例則必需要變更root(登入名稱)的密碼。

參考來源

https://github.com/gitlabhq/gitlabhq/blob/7-6-stable/doc/install/installation.md

本文大網

2017年5月22日 星期一

syslog 與 newsyslog 的設定方式

環境參數:
* 工作:設定 tinyproxy.log整合於syslog並自動壓縮 (logrotate)
* OS:FreeBSD i386 , 10.3-RELEASE-p11
* CPU:Intel(R) Core(TM)2 Duo CPU @ 3.00GHz
* RAM:4096 MB

整合於syslog與壓縮歸檔

常常在發生問題或需要資訊時,log檔就變的很重要;但是平時它卻是個佔用空間的元凶。如果你還沒遇上過動輒幾GB的寵然大檔,可能未曾心動,當然不會心痛。
因為一旦空間被吃掉,很多工作就停擺,雖然現在的儲存空間的成本大大降低,不過我們還是養成好習慣,把log整理,方便查詢追踪也不用擔心空間被佔用太多。
日後應該建置 Log Server 來統一存檔,但今天先把syslog與newsyslog ( Log Rotate )搞定!

tinyproxy

tinyproxy是套輕便的 Proxy 服務,簡單的安裝說明:

$ pkg install tinyproxy

設定檔存放在 /usr/local/etc/tinyproxy.conf
在設定檔中的Log設定,為了要整合在syslog中,也就是將log交給系統處理而不是tinyproxy自行寫入,設定如下:

User nobody
Group nobody
Port 8889
Listen 10.11.11.2
Bind 10.11.11.2
Timeout 600
DefaultErrorFile "/usr/local/share/tinyproxy/default.html"
StatFile "/usr/local/share/tinyproxy/stats.html"
# LogFile "/var/log/tinyproxy.log"
#
# Syslog: Tell tinyproxy to use syslog instead of a logfile.  This
# option must not be enabled if the Logfile directive is being used.
# These two directives are mutually exclusive.
# 整合在syslog中,則下行是必要的。如果要單獨交給tinyproxy寫入,則取消這行,改由 LogFile 取代之。
Syslog On
LogLevel Info
# 這個PidFile很重要,在newsyslog.conf中會用到
PidFile "/var/run/tinyproxy.pid"
MaxClients 30
MinSpareServers 5
MaxSpareServers 30
StartServers 10
MaxRequestsPerChild 0
# 允許來源存取IP
Allow 192.168.1.0/24
ViaProxyName "tinyproxy"
ConnectPort 443
ConnectPort 563
ConnectPort 22000

設定 syslog.conf

$ vi /etc/syslogd.conf
# 加入這二行,代表將tinyproxy執行序相關資訊寫入 /var/log/tinyproxy.log
!tinyproxy
*.*                                             /var/log/tinyproxy.log

如果還沒建立 /var/log/tinyproxy.log,可以用二種方式:
1. $ touch /var/log/tinyproxy.log
2. 在 newsyslog.conf中設定即可。

設定 newsyslog.conf

man newsyslog.conf 可知newsyslog的格式設定為:
# logfilename [owner:group] mode count size when flags [/pid_file] [sig_num]

$ vi /etc/newsyslog.conf
# 加入底下這行
/var/log/tinyproxy.log  644  10    100  *     JC  /var/run/tinyproxy.pid 1

參數說明:

  1. 644是檔案屬性。
  2. 10 則代表保留10份歸檔 (即/var/log/tinyproxy.log現行記錄外,再加上 /var/log/tinyproxy.log.0.bz2 ~ /var/log/tinyproxy.log.9.bz2共有11個記錄檔)
  3. 100則代表當檔案大小為100k時就進行歸檔壓縮。
  4. 100後面的*號代表不限時間,只要檔案超過100k就壓縮歸檔。
  5. C 代表 /var/log/tinyproxy 若不存在則自動建立此檔。
  6. J 代表 歸檔時以 bzip2格式壓縮,gzip則使用Z。
  7. /var/log/tinyproxy.pid是newsyslog在歸檔後會重啟這個PID。
  8. 最後一個1代表 /var/log/tinyproxy.pid只有1個執行緒;有時候像squid proxy會有多個,此時則需設定相同的數量。

重啟 syslog服務

$ service syslogd restart

或

$ killall -HUP syslogd

大工完成,看看log檔就可收到成效:

$ tail /var/log/tinyproxy.log
參考來源:

1.https://www.newsyslog.org/manual.html

本文大網

2017年2月19日 星期日

架設SoftEther作為VPN翻牆主機(FreeBSD)

FreeBSD最常見的VPN應用大多是利用PPP為基礎而建構的MPD5,其實還有更好的選擇 - SoftEther。這是一套由日本東京附近的筑波大學所研發的開源免費軟體,除了提供學術研究外,並也開放給外界使用,功能非常強大。

筑波大學離東京很近

enter image description here

SoftEather 具備以下特色,所以推薦能與大家一起學習如何運用它。

  1. 免費使用。
  2. 提供開放源碼。
  3. 而SoftEther的應用更廣泛免費的,日本學術,功能強大。
  4. VPN連線功能。
  5. 安全性高。
  6. 連接速度快。
  7. 易於管理。(更提供Windows管理介面)

本篇是以FreeBSD為Server端,也可以參考Windows端的SoftEther安裝方式。
有興趣可看看官網介紹

環境參數:

  • OS:FreeBSD i386 , 10.3-RELEASE-p11
  • CPU:Intel(R) Pentium(R) 4 CPU 1.80GHz
  • RAM:1152 MB
  • IP:fxp0:10.11.11.1
  • 工作目錄:/root
    官方建議的CPU是 2.0 GH以上。

安裝 SoftEther 之前準備

SoftEther 操作並不困難,安裝也簡便,花點時間多瞭解它,無妨。

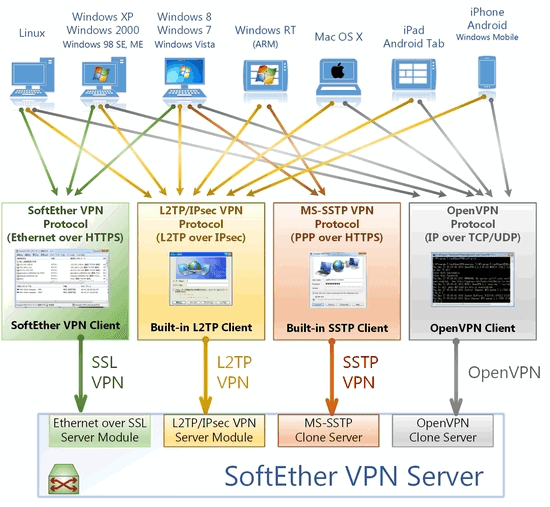
特色簡介

跨平台支援

enter image description here

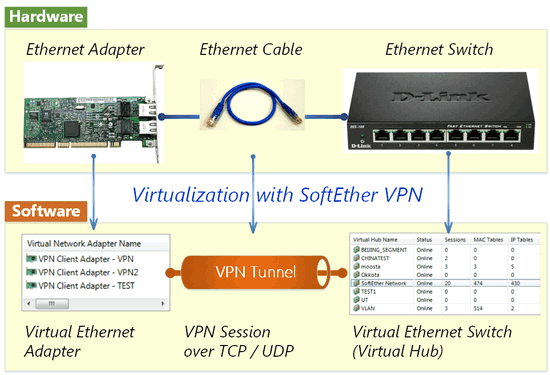
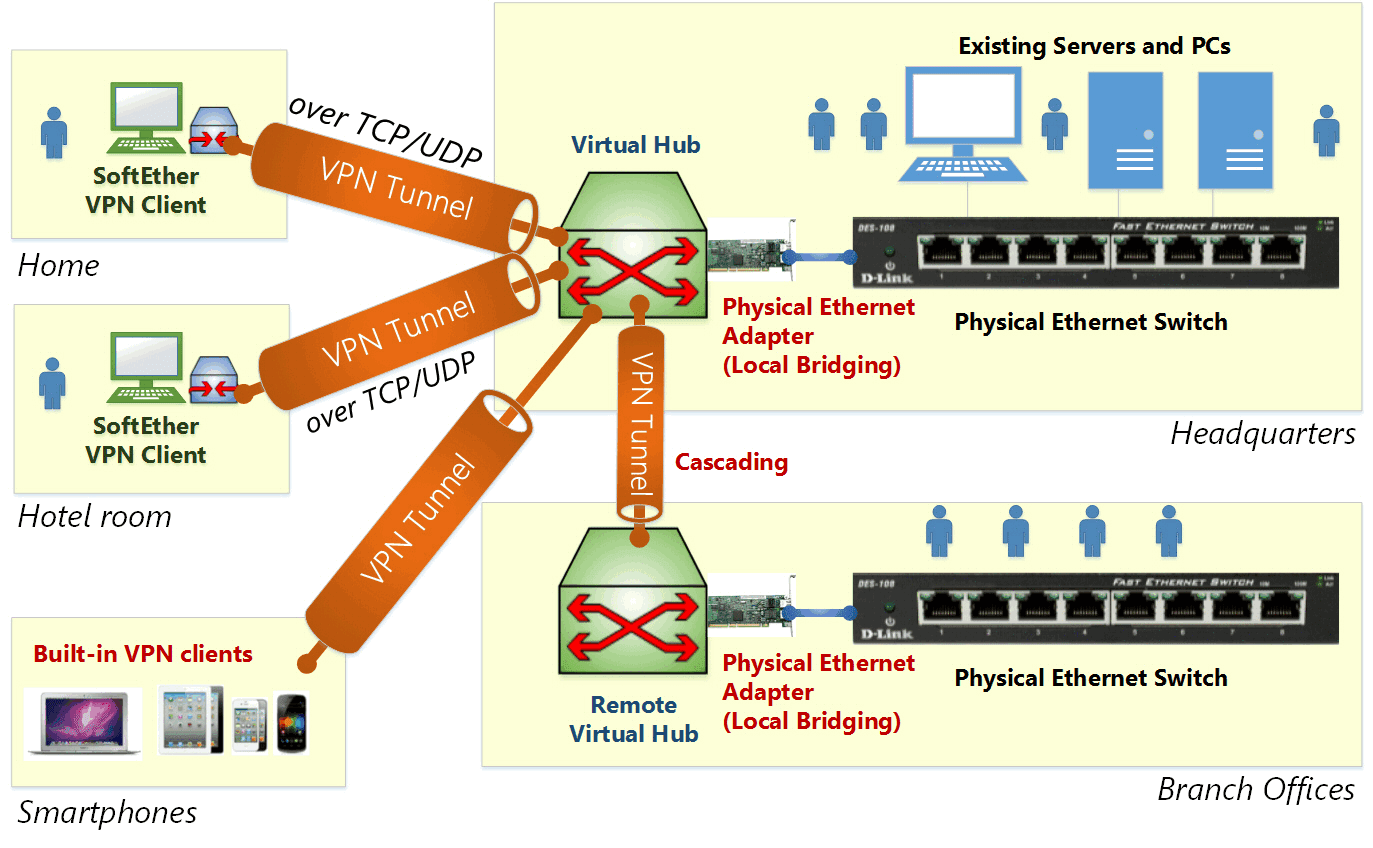
VPN架構(Virtual Hub & Local Bridge)

enter image description here

OpenVPN V.S. SoftEther

enter image description here

彈性應用,範圍廣泛

enter image description here

環境需求

作業系統

筑波大學真的很用心,幾乎囊括了所有的作業系統,這列表其實有等於無。
- Windows (32bit, 64bit)
Windows 98 / 98 SE / ME / NT 4.0 SP6a / 2000 SP4 / XP SP2, SP3 / Server 2003 SP2 / Vista SP1, SP2 / Server 2008 SP1, SP2 / Hyper-V Server 2008 / 7 SP1 / Server 2008 R2 SP1 / Hyper-V Server 2008 R2 / 8 / Server 2012 / Hyper-V Server 2012 / 8.1 / Server 2012 R2 / 10 / Server 2016
- Linux (32bit, 64bit)
Linux 2.4, 2.6, 3.x, 4.x
- Mac OS X (32bit, 64bit)
Mac OS X 10.4 Tiger / 10.5 Leopard / 10.6 Snow Leopard / 10.7 Lion / 10.8 Mountain Lion
- FreeBSD (32bit, 64bit) (Server and Bridge only)
FreeBSD 5, 6, 7, 8, 9
- Solaris (32bit, 64bit) (Server and Bridge only)
Solaris 8, 9, 10, 11

官網規格說明

硬體需求

  • CPU: 2.0 GHz以上
  • HD:30G~100G硬碟空間
  • -

系統環境

請檢查系統的防火牆是否有相衝突的設定規則:例如iptables、ipfw或pw等防火牆是否有阻擋IP或Port的規則?

所需的軟體及程式庫

  • gccbinutils utilities
  • libc (glibc)
  • zlib
  • openssl
  • readline
  • ncurses development library
    檢查系統是否有以上的條件,缺少的就進行安裝,底下是筆者的環境缺少所新增的套件安裝過程:
$ sudo pkg install gcc6-6.3.0
$ sudo pkg install libressl-devel-2.5.0_1
$ sudo pkg install binutils-2.27_5
$ sudo pkg install ncurses-6.0_3
$ sudo pkg install glib-2.46.2_4

下戴伺服端 Server

SoftEther在FreeBSD環境下的Server安裝方式有二種:原始檔編譯與pkg 安裝,先介紹編譯方式:

請依照自己的系統環境下載對應的原始碼後,進行解壓縮。
FreeBSD SoftEther 原始碼

下載客戶端 Client

Windows x86/x64客戶端

下載管理介面(Windows)

下載Windows x86/x64管理端

在FreeBSD環境下載Server端檔案後,解壓縮:

$ wget http://www.softether-download.com/files/softether/v4.20-9608-rtm-2016.04.17-tree/FreeBSD/SoftEther_VPN_Server/32bit_-_Intel_x86/softether-vpnserver-v4.20-9608-rtm-2016.04.17-freebsd-x86-32bit.tar.gz
$ tar zxvf softether-vpnserver-v4.20-9608-rtm-2016.04.17-freebsd-x86-32bit.tar.gz

編譯執行檔 Compile

$ cd vpnserver/
$ make
--------------------------------------------------------------------
SoftEther VPN Server (Ver 4.20, Build 9608, Intel x86) for FreeBSD Install Utility
Copyright (c) SoftEther Project at University of Tsukuba, Japan. All Rights Reserved.
--------------------------------------------------------------------

Do you want to read the License Agreement for this software ?

 1. Yes
 2. No

Please choose one of above number:
1 # 選擇 Yes,不要偷懶想選2(立即會被中斷安裝)

Did you read and understand the License Agreement ?
(If you couldn't read above text, Please read 'ReadMeFirst_License.txt'
 file with any text editor.)

 1. Yes
 2. No

Please choose one of above number:
1 # 選擇 Yes
Did you agree the License Agreement ?

1. Agree
2. Do Not Agree

Please choose one of above number:
1 # 選擇 Yes

--------------------------------------------------------------------
The preparation of SoftEther VPN Server is completed !

*** How to switch the display language of the SoftEther VPN Server Service ***
SoftEther VPN Server supports the following languages:
  - Japanese
  - English
  - Simplified Chinese

You can choose your prefered language of SoftEther VPN Server at any time.
To switch the current language, open and edit the 'lang.config' file.


*** How to start the SoftEther VPN Server Service ***

Please execute './vpnserver start' to run the SoftEther VPN Server Background Service.
And please execute './vpncmd' to run the SoftEther VPN Command-Line Utility to configure SoftEther VPN Server.
Of course, you can use the VPN Server Manager GUI Application for Windows on the other Windows PC in order to configure the SoftEther VPN Server remotely.
--------------------------------------------------------------------
# 看到這段信息,安裝就成功了。

將 vpncmd 、vpnserver、hamcore.se2以及lang.config 這4個檔案複製到執行目錄(例:/root/sbin或/usr/local/sbin)下即可。

$ sudo cp vpncmd /root/sbin
$ sudo cp vpnserver /root/sbin
$ sudo cp hamcore.se2 /root/sbin
$ sudo cp lang.config /root/sbin
$ sudo chmod +x /usr/local/sbin/vpn*

以 pkg 安裝

$ pkg search softethervpn
softethervpn-4.21.9613         Cross-platform Multi-protocol VPN Software
$ sudo pkg install softethervpn-4.21.9613

以pkg install安裝方式的執行檔存放在:/usr/local/sbin,這與自行編譯的方式不同,要留意此點,本篇的工作目錄在/root/sbin。

開啟自動執行檔

自行Compile原始檔後,缺少了開機script.,有需要請自行下載後,老動作別忘了:

$ sudo vi /etc/rc.conf
# SoftEther
vpnserver_enable="YES"
/usr/local/etc/rc.d/vpnserver
/usr/local/etc/rc.d/vpnclient

啟動 vpnserver

語系檔

編輯lang.config設定語系(日、簡中、英):

$ sudo vi /root/sbin/lang.config
# Available Language IDs are:
#  ja: Japanese (日本語)
#  en: English (English)
#  cn: Simplified Chinese (简体中文)
en

vpncmd 檢測環境

$ sudo /root/sbin/vpncmd
vpncmd command - SoftEther VPN Command Line Management Utility
SoftEther VPN Command Line Management Utility (vpncmd command)
Version 4.20 Build 9608   (English)
Compiled 2016/04/17 21:59:35 by yagi at pc30
Copyright (c) SoftEther VPN Project. All Rights Reserved.

By using vpncmd program, the following can be achieved.

1. Management of VPN Server or VPN Bridge
2. Management of VPN Client
3. Use of VPN Tools (certificate creation and Network Traffic Speed Test Tool)
Select 1, 2 or 3: 3

VPN Tools has been launched. By inputting HELP, you can view a list of the commands that can be used.
VPN Tools>check
Check command - Check whether SoftEther VPN Operation is Possible
---------------------------------------------------
SoftEther VPN Operation Environment Check Tool

Copyright (c) SoftEther VPN Project.
All Rights Reserved.

If this operation environment check tool is run on a system and that system pass                                              es, it is most likely that SoftEther VPN software can operate on that system. Th                                              is check may take a while. Please wait...

Checking 'Kernel System'...
              Pass
Checking 'Memory Operation System'...
              Pass
Checking 'ANSI / Unicode string processing system'...
              Pass
Checking 'File system'...
              Pass
Checking 'Thread processing system'...
              Pass
Checking 'Network system'...
              Pass

All checks passed. It is most likely that SoftEther VPN Server / Bridge can operate normally on this system.

The command completed successfully.
VPN Tools>exit

通過檢查後,就進行下一步。

啟動 SoftEther VPN 服務

使用啟動指令來啟用vpnserver:

$ sudo /usr/local/etc/rc.d/vpnserver start
The SoftEther VPN Server service has been started.

若是試驗性質,也可以直接執行vpnserver命令:

$ sudo /root/sbin/vpnserver start

檢查是否有在運行:

$sudo ps ax|grep vpnserver
50381  -  S<s      0:00.01 /usr/local/softethervpn/vpnserver/vpnserver execsvc
50382  -  S<       0:00.36 /usr/local/softethervpn/vpnserver/vpnserver execsvc
50386  0  S+       0:00.01 grep vpnserver

管理 vpnserver

要管理 SoftEther 所建立的 vpnserver,可經由* vpncmd* 來達成而毋需重啟服務,除了下列情況才需要重啟 vpnserver:

  • 作業系統(O.S.)重開機。
  • 更新(升級)SoftEther VPN Server 程式。
  • 硬體發生問題而導致 VPN Server 無法正常運行。
  • 手動更動 VPN Server 設定或回復前一次設定時。
  • 變更 VPN Server 叢集時。

  • 目前的圖形化管理介面只有支援 Windows或Mac OS。

進入vpnserver 管理介面

重點觀念:要先建立 Virtual Hub,再依序建立 Local Bridge。
利用vpmcmd指令建立 Virtual Hub,先選1建立VPN Bridge,再按2次Enter:

$ sudo /root/sbin/vpncmd
vpncmd command - SoftEther VPN Command Line Management Utility
SoftEther VPN Command Line Management Utility (vpncmd command)
Version 4.20 Build 9608   (English)
Compiled 2016/04/17 21:59:35 by yagi at pc30
Copyright (c) SoftEther VPN Project. All Rights Reserved.

By using vpncmd program, the following can be achieved.

1. Management of VPN Server or VPN Bridge
2. Management of VPN Client
3. Use of VPN Tools (certificate creation and Network Traffic Speed Test Tool)

Select 1, 2 or 3: 1

Specify the host name or IP address of the computer that the destination VPN Server or VPN Bridge is operating on.
By specifying according to the format 'host name:port number', you can also specify the port number.
(When the port number is unspecified, 443 is used.)
If nothing is input and the Enter key is pressed, the connection will be made to the port number 8888 of localhost (this computer).
Hostname of IP Address of Destination:

If connecting to the server by Virtual Hub Admin Mode, please input the Virtual Hub name.
If connecting by server admin mode, please press Enter without inputting anything.
Specify Virtual Hub Name:
Connection has been established with VPN Server "localhost" (port 443).

You have administrator privileges for the entire VPN Server.

VPN Server>

建立 VPN Virtual Hub

此時進入VPN管理模式,建立一個名為vpn1,密碼空白的 Virtual Hub:
vpncmd指令:

  • HubCreate:建立Virtual Hub。
  • Hub 名稱:查詢所要管理的Virtual Hub。
  • Online:啟動Virtual Hub。
VPN Server>Hub VPN
Hub command - Select Virtual Hub to Manage
Error occurred. (Error code: 8)
The specified Virtual Hub does not exist on the server.
VPN Server>HubCreate
HubCreate command - Create New Virtual Hub
Name of Virtual Hub to be created: hub1

Please enter the password. To cancel press the Ctrl+D key.
Password: 
Confirm input: 
The command completed successfully.

確認是否成功建立名稱為:vpn1 的Virtual Hub

VPN Server>Hub vpn1
Hub command - Select Virtual Hub to Manage
The Virtual Hub "vpn1" has been selected.
The command completed successfully.

將vpn1啟動為上線狀態

VPN Server/vpn1>Online
Online command - Switch Virtual Hub to Online
The command completed successfully.

建立 VPN Local Bridge

建立完Hub後,接著建立一個新的 Local Bridge:Virtual Hub名稱為hub1(上一個步驟所建立),網路卡裝置為fxp0(網路卡裝置名稱):
vpncmd指令:

  • BridgeList:Local Bridge列表。
  • BridgeCreate:建立 Local Bridge。
  • ServerPasswordSet:變更系統管理密碼。
  • SetHubPassword:變更 Virtual Hub 管理密碼。
VPN Server/vpn1>BridgeList
BridgeList command - Get List of Local Bridge Connection
Number|Virtual Hub Name|Network Adapter or Tap Device Name|Status
------+----------------+----------------------------------+------
The command completed successfully.

VPN Server/vpn1>BridgeCreate
BridgeCreate command - Create Local Bridge Connection
Virtual Hub Name to Create Bridge: hub1

Bridge Destination Device Name: fxp0

While in the condition that occurs immediately after a new bridge connection is made when bridging to a physical network adapter, depending on the type of network adapter, there are cases where it will not be possible to communicate using TCP/IP to the network adapter using a bridge connection from a computer on the virtual network.
(This phenomenon is known to occur for Intel and Broadcom network adapters.)

If this issue arises, remedy the situation by restarting the computer on which VPN Server / Bridge is running. Normal communication will be possible after the computer has restarted.

Also many wireless network adapters will not respond to the sending of packets in promiscuous mode and when this occurs you will be unable to use the Local Bridge. If this issue arises, try using a regular wired network adapter instead of the wireless network adapter.

The command completed successfully.

變更管理密碼

VPN Server>ServerPasswordSet
ServerPasswordSet command - Set VPN Server Administrator Password
Please enter the password. To cancel press the Ctrl+D key.

Password: **********
Confirm input: **********

The command completed successfully.

變更Hub管理密碼

SetHubPassword
SetHubPassword command - Set Virtual Hub Administrator Password
Please enter the password. To cancel press the Ctrl+D key.

Password: **********
Confirm input: **********

The command completed successfully.

這樣就大致完成了 SoftEther VPN Server 的安裝,接著只要利用的 Windows 管理介面來管理即可,非常方便。

SoftEther VPN 管理篇
本文大網

2017年2月13日 星期一

利用ssmtp設置Sendmail經由Gmail寄信

即時聊天傳訊軟體在手機上屢屢出新,但很多時候還是email可靠方便。幾年前手機正在漫延這個世界時,自己想架設 Mil Server 已不容易,不但要面對 Sendmil 或 Postfix 複雜的設定,同時又要抵檔垃圾信(當然也要想辦法要其它的 Mail Server 願意收你自己架的 Mail Server 所寄出去的信),自從 Gmail 普遍之後,似乎鮮少有人會討論 Mail Server 的架設技術了。
不過地球還真的有點圓,科技突飛猛進,但感覺在2015年終後開始有點復古的走法,這只是個人感受,進入主題吧!

設定rc.conf,取消sendmail

$ sudo vi /etc/rc.conf
sendmail_enable="NO"
sendmail_submit_enable="NO"
sendmail_outbound_enable="NO"
sendmail_msp_queue_enable="NO"

安裝SSMTP

$ cd /usr/ports/mail/ssmtp/
$ sudo make install clean
To replace sendmail with ssmtp type "make replace" or change
your /etc/mail/mailer.conf to:

sendmail    /usr/local/sbin/ssmtp
send-mail   /usr/local/sbin/ssmtp
mailq       /usr/local/sbin/ssmtp
newaliases  /usr/local/sbin/ssmtp
hoststat    /usr/bin/true
purgestat   /usr/bin/true

編譯並安裝完成後,會新增ssmtp使用者,有關作者的提示(make replace)等成功寄信後再處理。

SSMTP 組態

$ sudo cp /usr/local/etc/ssmtp/ssmtp.conf.sample /usr/local/etc/ssmtp/ssmtp.conf
#
# /etc/ssmtp.conf -- a config file for sSMTP sendmail.
#

root=postmaster
mailhub=smtp.gmail.com:587
AuthUser=《輸入Gmail帳號_@gmail.com》
AuthPass=《輸入Gmail帳號的密碼》
rewriteDomain=domain.com.tw #rewrite
hostname=domain.com.tw #hostname
FromLineOverride=YES
UseTLS=YES

# Use SSL/TLS certificate to authenticate against smtp host.
#UseTLSCert=YES

UseSTARTTLS=YES

# Use this RSA certificate.
#TLSCert=/usr/local/etc/ssmtp/ssmtp.pem
#Debug=YES

測試SSMTP

設定好ssmtp.conf之後,接著寄出一封測試信,請把yourmail@gmail.com換成自己的信箱。

$ vi test.mail
To: yourmail@gmail.com
From: yourmail@gmail.com
Subject: Testmessage
This is a test for sending
$ ssmtp -v yourmail@gmail.com < test.mail

開始出現寄信的畫面,等它跑完,然後去檢查信箱是否有收到測試信,如果沒收到,請再檢查看看ssmpt.conf是否有設定錯誤之處。

以ssmtp取代sendmail寄信

在安裝步驟最後說明的很清楚,就下個指令即可:

$ cd /usr/ports/mail/ssmtp
$ sudo make replace

接著就可以以舊有的寄信指令來測試

$ mail -v -s "test subject" yourmail@gmail.com

果然收到信了,很簡單的設定,收工。

2017年2月11日 星期六

Nextcloud 個人雲端系統

環境參數:

  • OS:FreeBSD i386 , 10.3-RELEASE-p11
  • CPU:Intel(R) Core(TM)2 Duo CPU @ 3.00GHz
  • RAM:4096 MB
  • 主機網站:http://10.11.11.28

安裝NextCloud Server端

以套件安裝

Nextcloud在很多平台都有專用的套件可供安裝,可依照系統需求來下戴,同時也有最新版本可供喜歡搶新者下載。
各平台的套件下載:

$ sudo pkg install nextcloud
# 以pkg安裝後,檔案預設路徑為:/usr/local/www/nextcloud

Web Installer

NextCloud也提供更方便的安裝法:Web Installer,只需下戴setup-nextcloud.php,再於瀏覽器執行此程式即可。
執行安裝
在瀏覽器輸入http://10.11.11.28/setup-nextcloud.php,即可進行安裝,簡單幾個步驟即可完成了。

Step 1:歡迎畫面

歡迎畫面

Step 2:一個按鍵就完成安裝,非常方便

一個按鍵就完成安裝,非常方便

Setp 3:設定管理者帳號密碼

設定管理者帳號密碼*

Step 4:以帳號密碼登入後的管理介面。

以帳號密碼登入後的管理介面

安裝Next Cloud Client端

Next Cloud提供了各種Client端,
桌面客戶端
Android 應用程式
iOS 應用程式
使用及安裝方式非常簡便,在此不贅述。同時NextCloud也有第三方的extention,有興趣可以安裝試試!

本文大網

2017年2月5日 星期日

Lighttpd Reverse Proxy To Nginx

Lighttpd Reverse Proxy To Nginx

環境參數:

  • OS:FreeBSD i386 , 10.3-RELEASE-p11
  • CPU:Intel(R) Core(TM)2 Duo CPU @ 3.00GHz
  • RAM:4096 MB
  • 主機:
    1. 外部主機:outside_ip1 , 192.168.0.1
    2. 內部主機:192.168.0.2(lighttpd),192.168.0.3(nginx)
    3. 其它主機:8.8.8.8
    4. 網址1:url1.com.tw
    5. 網址2:url2.com.tw
    6. 網址3:url3.com.tw
    7. 網址a:external.com.tw

任務目的及架構

現有與外面連接的外部主機(192.168.0.1),以PPPOe撥接ADSL,並透過Hub與內部網路主機(192.168.0.2)相連接。
我們不希望內部主機直接與網路連接,並透過外部主機提供WWW服務。作法有很多,諸如利用Apache Reverse Proxy、IPFW或IPTABLES等機制都能作到,本文主要探討以Lighttpd擔任Reverse Proxy Server,以達到:
1. 連接到內部的 Nginx Web Server 的網站服務。
2. 連接到外部其它網站。

內部轉址1,系統負載低,採Lighttpd

Created with Raphaël 2.1.2外部網址1轉到內部主機 port 80url1.com.tw(Lighttpd)url1.com.tw(Lighttpd)Lighttpd(192.168.0.2:80)Lighttpd(192.168.0.2:80)-> 透過Lighttpd proxy

內部轉址2,系統負載高,採Nginx

Created with Raphaël 2.1.2外部網址2轉到內部主機 port 88url2.com.tw(Lighttpd)url2.com.tw(Lighttpd)Nginx(192.168.0.3:88)Nginx(192.168.0.3:88)-> 透過Lighttpd proxy

外部轉址a,純粹轉址

Created with Raphaël 2.1.2外部網址a轉到外部其它主機url3.com.tw(Lighttpd)url3.com.tw(Lighttpd)其它主機urla.com.tw其它主機urla.com.tw-> 透過Lighttpd proxy

Lighttpd 前端設置

Lighttpd 的設定include非常彈性,端看您如何配置。本例將mod_proxy皆由/usr/local/etc/lighttpd/conf.d/lighttpd-proxy.conf控制及設定。

首先在modules.conf定義引proxy設定檔(lighttpd-proxy.conf)

$ sudo vi /usr/local/etc/lighttpd/modules.conf
# mod_proxy預設檔名是:conf.d/proxy.conf,備而不用,先開啟新檔案名稱:lighttpd-proxy.conf
include "conf.d/lighttpd-proxy.conf"
  • lighttpd-proxy.conf 要引用mod_proxy模組功能,記得要加入:*server.modules += ( “mod_proxy” )(這段文字只能加入一次,否則會出現重覆引用錯誤)
    接著設定三種情境的Lighttpd Reverse Proxy:
$ sudo vi /usr/local/etc/lighttpd/conf.d/lighttpd-proxy.conf
#######################################################
##
##  Proxy Module 
## --------------- 
## http://www.lighttpd.net/documentation/proxy.html
##

# 啟用mod_proxy模組

server.modules += ( "mod_proxy" )

# 內部轉址1,外部網址1轉到內部主機 Lighttpd port 80
$HTTP["host"] == "url1.com.tw" {
proxy.server = ( "" =>
                ( 
                   (
                     "host" => "192.168.0.2",
                     "port" => 80
                   )
                )
            )
}

# 內部轉址2,外部網址2轉到內部主機 Nginx port 88
$HTTP["host"] == "url2.com.tw" {
proxy.server = ( "" =>
                ( 
                   (
                     "host" => "192.168.0.3",
                     "port" => 88
                   )
                )
            )
}

# 外部轉址a,直接將所有來訪 url.outside.domain的連線導向到IP:8.8.8.8 Port:80的其它外部網站
$HTTP["host"] == "url.outside.domain" {
proxy.server = ( "" =>
                ( 
                   (
                     "host" => "8.8.8.8",
                     "port" => 80
                   )
                )
            )
  }

Nginx 內部主機設置

內部主機可由Apache、Nginx或Lighttpd來擔任,端看實際需求及系統資源自由調配,依照各Server的特性來指派轉址目的服務主機。

Lighttpd 虛擬主機 NameBased Vhosts設定

較輕負載大多是單純的HTML服務,筆者偏好採用 Lighttpd,故外部轉址1到內部主機時就使用 Lighttpd,但因 Lighttpd Server 也有多台的虛擬主機,為能準確達成外部連至指定的虛擬主機,設定如下:

$ sudo vi /usr/local/etc/lighttpd/lighttpd.conf
# 虛擬主機設定
include "/usr/local/etc/lighttpd/vhosts.d/lighttpd-vhosts.conf"

因為前端Lighttpd是將內部轉址1導向到192.168.0.2:80的Lighttpd,所以在虛擬主機設定檔要跟在$SERVER[“socket”] == “192.168.0.2:80”區段之後,參考如下:

# sudo vi /usr/local/etc/lighttpd/vhosts.d/lighttpd-vhosts.conf
#+---------------------------------------------------------------
# /usr/local/etc/lighttpd/vhost.d/lighttpd-vhosts.conf
# Lighttpd vhost conf
#------------------------------------------------------------------------------
# 第1台預設主機IP:192.168.0.9 Port 80

  $SERVER["socket"] == "192.168.0.9:80" {

    server.document-root = "/data/htdocs/default-ip9" 

      # 符合第1台主機IP的虛擬主機,凡是訪問tiger.com.tw的就轉到這台主機設定
      $HTTP["host"] == "tiger.com.tw" {
        server.document-root = "/data/htdocs/tiger.com.tw"
      }

  }

# 第2台主機IP:192.168.0.2 Port 80

  $SERVER["socket"] == "192.168.0.2:80" {

    server.document-root = "/data/htdocs/default-ip2" 

    # 符合第2台主機IP的虛擬主機,凡是訪問url1.com.tw的就轉到這台主機設定
    $HTTP["host"] == "url1.com.tw" {
        server.document-root = "/data/htdocs/url1.com.tw"
    }

  }

Nginx 虛擬主機 NameBased Vhosts設定

Nginx 搭配FastCGI(PHP FPM)的作法在此不多記載,主要探討虛擬主機的設定方法。

$ sudo vi/usr/local/etc/nginx/nginx.conf
# 加入這行,以引用所有的虛擬主機設定檔
include /usr/local/etc/nginx/site_enabled/*.conf;

不論 Nginx 主設定檔(/usr/local/etc/nginx/nginx.conf)或其它虛擬主機如何設定,Nginx 必先找尋先以英文字母排列結果最先讀取的主機內容為預設主機,所以要檔名編排上要多加留意。

#-----------------------------------------------------------------------------+
server {
        listen 192.168.0.3:88;
        server_name url2.com.tw;
        server_name_in_redirect off;
        root /data/htdocs/url2.com.tw;
        access_log   /data/weblogs/url2.com.tw-access.log;
        error_log    /data/weblogs/url2.com.tw-error.log;
        index index.php index.html; 

        location / {
                try_files $uri $uri/ /index.php?q=$uri&$args;
                proxy_read_timeout 300;
                autoindex on;
        }

        location ~ \.php$ {
            fastcgi_pass unix:/var/run/php-fpm.sock;
            fastcgi_index index.php;
            try_files $uri =404;
            fastcgi_split_path_info ^(.+\.php)(/.+)$;
            fastcgi_param SCRIPT_FILENAME /data/htdocs/url2.com.tw/$fastcgi_script_name;
            include fastcgi_params;
            fastcgi_read_timeout 300;
        }

        location ~* ^.+\.(ico|js|gif|jpg|jpeg|png|bmp)$ {
          expires 30d;
        }

        location ~ /\.ht {
            deny all;
        }

        error_page 404 /404.html;

        error_page 500 502 503 504 /50x.html;
        location = /50x.html {
                root /usr/local/www/nginx;
        }
}

結語

本實作記錄並非刻意將簡單的反向代理機制複雜化,一般而言只要簡單的Apache Reverse Proxy(外部)搭配內部的Apache服務主機即可達到轉址目的。
然而隨著網路多元化的演進,適度的應用輕量級的Lighttpd或高負載的Nginx是必要的,僅將實作的過程記錄。

本文大網

2017年2月2日 星期四

初探 Google 熱門語言:Go

Go 程式語言在近幾年市佔率竄起迅速,所以我對它很好奇,試著在FreeBSD下安裝執行環境,順便看看程式語言的排行統計:

Google Go的錢途排行

enter image description here

Google Go上升迅速

enter image description here

Go支援各平台安裝

安裝下載連結

環境參數:

  • OS:FreeBSD i386 , 10.3-RELEASE-p11.

安裝Go編譯器(舊版 1.4)

在安裝Go的語言工具之前,要先裝 Go 編譯器(Go compiler ),以便往後的編譯工作能順利進行,GOROOT_BOOTSTRAP 預設值是 $HOME/go1.4。
我在家目錄中工作,所以預設的GOROOT_BOOTSTRAP = /home/jim/go。

在原始碼編譯過程中有二項選擇:
1.all.bash會進行Go的很多測試工作,時間耗費較久。
2.make.bash會省略測試過程,冒險節省時間的話就用此選項。
本例使用make.bash來進行安裝。

    $ cd ~
    $ wget https://storage.googleapis.com/golang/go1.4-bootstrap-20161024.tar.gz
    $ tar zxvf go1.4-bootstrap-20161024.tar.gz
    $ cd go/src
    $ export GOROOT=/usr/home/jim/go
    $ export GOARCH=386
    $ export GOOS=freebsd
    $ GOROOT_BOOTSTRAP=/usr ./make.bash
    Installed Go for freebsd/386 in /usr/home/jim/go
    Installed commands in /usr/home/jim/go/bin
    $  /home/jim/go/bin/go version
        go version go1.4-bootstrap-20161024 freebsd/386

安裝 Go(新版 1.7.5)

用git clone最新版本,

    $ git clone https://go.googlesource.com/go
    $ cd go
    $ git checkout go1.7.5
        You are in 'detached HEAD' state.

檢查一下有沒有更新版本,

    $ git checkout master
        Previous HEAD position was 753452f... [release-branch.go1.7] go1.7.5
        Switched to branch 'master'
        Your branch is up-to-date with 'origin/master'.
    $ cd src
    $ ./make.bash
    $ /usr/home/jim/jjrepo/go/bin/go version
        go version devel +4cffe2b Sun Jan 29 23:31:20 2017 +0000 freebsd/386

這是開發中版本。

測試安裝結果

    $ vi hello.go

package main
import “fmt”
func main() {
fmt.Printf(“hello, world\n”)
}

    $ /home/jim/go/bin/go run hello.go

終端輸出:
hello, world

學如如何編程Go
參考來源:

1.https://golang.org/doc/install/source?download=go1.7.5.src.tar.gz

本文大網